Wednesday 30 July 2014

Friends are like stars

Hello my dear crafty friends!

 Today  I am going to show you my use of Xmas die for non Holidays card and it actually WORKS!
This is July new release Delicate Star die and it was used as a main point of this Good friends are like stars sentiment from Inspired by Stamping . I made a cut from thick silver glitter cardstock and made my background with washi tapes only.
The small stars are heat embossed chipboards.


Hope you got my point: any die can be used " out of the box". Just try to find a good sentiment and make the connection over your project.


Tuesday 29 July 2014

CHF 3 MEDIUMS WEEK


Hello my dear crafty friends and welcome to our new Cornish Heritage Farms challenge and this is the challenge I picked for you this time: use at least three different mediums  to make your card or other crafty project.
This is what I made this time: CHF delicious Asian #10 digital stamp was printed over the transparency and added to Gelli plate background made with a mix of acrylic paints, masks and a lot of mess.

 My background card was inked with blue ink over the edges. The inside pink inked frame was die cut from a white thin chipboard. 
The chipboard leaves and flowers were misted   to fit the frame color and I added some clear glitter glue over them for the interest.

So as you can see I used more then 3 mediums here and still this card is very flat and not too messy. Now it's your turn: make a project with CHF and link it so everyone can see it. And here is a list of all our designers for you to be inspired this time:
Cornish Heritage Farms Blog - http://cornishheritagefarms.blogspot.com
Frances Byrne (Design Team Co-ordinator) - http://stampowl.blogspot.com
Kristine Reynolds - http://stampingandscrapingincalifornia.blogspot.com
Steph Ackerman - http://stephaniescraps.blogspot.com/ 
Amber Hillman - http://ambersantics.blogspot.com
Ann Marie Saunders - http://cre8nart.blogspot.com
Irit Shalom - http://iritshalom.blogspot.co.il
Kelly Santi - http://sandcastlestamper.blogspot.com
Maureen Russell - http://maureensmagic.blogspot.com

Winter blessings in July

Hello my dear crafty friends!
Irit is here again and as I finally got my gorgeous delicious new release dies, I can even make my posts in time.
 Die - Versions is celebrating Christmas in July and those  are my share of those new fantastic dies.
So here are those beauties on my two new winter cards.
As I don't celebrate Xmas, I just made winter cards for all occasions and it works just perfect with those great Die- Versions dies and some perfect Inspired by Stamping Holiday stamps.
The first card was made with a couple of background layers: the white is dry embossed and the upper blue is stamped and misted over the heat embossed background.

Then I made 3 cuts of this gorgeous Whispers Delicate present die with black, dark blue and white cardstocks and made a single shape with old and forgotten brads. It's very easy to connect all three cuts with brads without making and holes with this die cut shape.

Then I added a single dark blue die cut using the new delicate Scrolly Bow die and embellished the top of the present die with a fancy bow. A stamped small tag was added on the bottom together with a couple of 3d stickers and this card was done. Both tag and sentiment stamps are from  Inspired by Stamping winter set from last year and it's timeless!  Lots of techniques, but very easy to make card after all.
My second card for today is a winter card again and this time I used a new released most adorable Whispers Winter Cottage die and made a cut from glittered dotted cardstock. The empty holes in the cut shape were covered with glitter  glue for the snow effect.

The snowflakes background is dry and heat embossed all together and the sentiment was made with a couple of stickers from Paper House Productions. The last touch are those fancy pearl swirls and my winter card is done.

I hope you like my Winter in July share and see you soon again!


Monday 28 July 2014

Ann Butler: Welcome Home

Hello my dear crafty friends and welcome to my monthly post made for Ann Butler's blog . Today I an going to share my Welcome Home sign and I really hope that you like it.
The idea of this sign came from those kid's very first houses drawings; those rectangles or squares and triangle roof were my inspiration for this  project. As Ann's stamps are squares and triangles it was 
just " must to do" project. And here it is as a finished sign; add it to a big flower arrangement or put in a nice jar and it can be used again and again.


Each house was hand cut in a different shape after I stamped Ann 's 2''  Checkered Woven Hearts  - Kellycraft stamps-  over a white thick cardstock. Then I colored the house body with Ann Butler's Clearsnap Crafter's Inks and arranged the house  in the final position.  The roofs were stamped with triangle stamps and I tried to fit the roof color to the house and to its neighbours.

I stamped HOME letters with Ann's delicious  Flourish 2'' ABC'S alphabet set and added some die cut brick walls around the letters. 
Then I added a few of die cut pieces such as Welcome banner and a couple of flowers and butterflies painted with the very same Ann Butler's inks.


Supply list:
Ann Butler's products
EZ De's Easy Design Elements: Checkered Woven Hearts  - Kellycraft
Flourish 2'' ABC'S- Kellycraft
Crafter's inks - Clearsnap
Other products:
Cardstock- American Crafts
Dies- Die Versions
Bling- Flourish with a Bling
Ribbon- May Arts

Saturday 26 July 2014

Ann Butler and Cool 2 Cast blog hop

 Hello my dear crafty friends and welcome to Ann Butler's and Cool 2 Cast design teams blog hop.


This is a place where we are going to show you our projects made with both companies products and here is my part.
I made this round wall  deco and the circled plastic base is a pure recycling: I don't even know where I found this white plastic piece, but I was sure that I can use it in the future and so it was.
Every single inside piece is made with Cool 2Cast great product and as a dentist I asked was a " real thing" and casted my own shapes; the only shape that was shipped to me already casted was this lovely big heart on the bottom.
All molds I used here are from WOW! Embossing Powders and I actually made one for myself: this lovely cupid in the middle (lucky me again- dentist can mold things with their materials).
 Then each molded and  air dry piece was painted with a mix of Ann Butler's Crafter's inks from Clearsnap.
 Those inks have great coverage for casting materials too as you can see. The whole finished piece was misted with a light gold mist and I added this huge bow and the lovely plastic leaves to make it very fancy.


And now this is a list of all other designers on this blog hop.
Please visit them all and leave them some love and you can win some great goodies from Cool2cast company.


To enter simply leave a comment here.  For more chances to win and to see other great projects using Cool2Cast and Ann Butler Designs products check out the rest of the blog hop below and leave a comment for each of them.
Deadline for entering the giveaway is August 8th, 2014 at 11:59 pm.
Irit Shalom- YOU ARE here

Friday 25 July 2014

IBS NEW RELEASE: CHEVRONS

Hello my dear crafty friends and welcome to our Inspired by Stamping new July release.
This is the last day of this gorgeous release and will show you my work with all those stamps next month, but today this is our Chevrons set day and here is my card made with this lovely  new set.
My card this time is a totally modern kind of Mixed Media creation. I made it with a long line of chevrons arranged  for the easy stamping. The stamping was made with clear embossing ink and white heat embossing. I also added this Hello sentiment from another new released set. Then I melted wax crayons over the black background t get this artistic look and added one single Create/Inspire sticker as this is a totally inspirational card that can be used for any summer occasion.

Thursday 24 July 2014

Graduation card

Fast and easy card made with Die Versions Bricks background die and Paper House Productions papers and stickers.


Tuesday 22 July 2014

SS Xmas tag


Hello our dear crafty friends and welcome to Sweet Stamps Xmas in JULY month.
Today we are going to show you our Xmas tags and here is mine. The delicious Snowflake was stamped on the background and over the  upper smaller tag. I also made the vellum stamped border with Lace border stamp and layered it over the inner tag. The tag was finished with PHP few 3d stickers: easy and fast way to get this " professional"  look with less work. Fancy trims were the  last touch on this tag.


 And now it's your turn: enter to our  SS challenge and you have a fair chance to win!

Monday 21 July 2014

SS MONTHLY challenge : Anything goes with Parchment

Hello my dear crafty friends! 
Irit is here again and this is my Anything goes with parchment project.
I know that it's not a regular parchment, but kind of a stamped one, but this is the beauty of Sweet Stamps! You can make a faux parchment using SS most gorgeous White Dye ink and any of those deep etched stamps, even acrylic ones.
So here is my card, all made from vellum with cardstock base only.


The new June released  ATC Backgrounds #3  were stamped with white ink over the vellum and heat embossed with Fine white Embossing powder.
Then I cut this background piece and layered it over red cardstock.
Then I stamped one single border from new June released  Sketched Floral borders  set  several times , again  with white ink and white powder  and punched a circle of those flowers to become my focal stamped point.

Everything else are just a die cut sentiment and some small embellishments: red pearls, a sticker and three real head pins  in great pink colors.

I hope you like my faux parchment card and our SS new release. Please join us in this month Parchment challenge and you can win some great goodies too.
See you in two weeks with more SS inspiration.


Wednesday 16 July 2014

Love you tag

Made with Tando Creative flowers, Die Versions background, border  and words  die, MME papers and Faber Castell DMC Gelatos- this tag was already web published in SG Create web magazine .


Tuesday 15 July 2014

CHF XMAS in July challenge


Hello my dear crafty friends and welcome to our new Cornish Heritage Farms challenge. This time  the challenge is to make Xmas  project with Thomas Kinkade stamps from CHF.  Hard one as I really don't have any Xmas supplies in July and can't buy any here in Israel (usually I order some to make cards for my friends around the world, but not in July...). So I decided to move to Winter Holidays general card and made
this " It's cold outside" winter card with TK gorgeous stamp  Streams of Living Water, stamped with blue distress ink with a touch of outer water coloring with Gelatos and a touch of stickles over the stamped image. It screams winter and I really like the outcome. Hope you like it too. So easy and fast and fancy: just one stamp, one ink and a good pressure. Nothing more.

Now it's your turn to show us your skills with big scene stamps from TK at CHF.http://cornishheritagefarms.blogspot.co.il/

 And now you are invited to visit all other CHF designers blogs with much more gorgeous inspiration
Cornish Heritage Farms Blog - http://cornishheritagefarms.blogspot.com
Frances Byrne (Design Team Co-ordinator) - http://stampowl.blogspot.com
Kristine Reynolds - http://stampingandscrapingincalifornia.blogspot.com
Steph Ackerman - http://stephaniescraps.blogspot.com/ 
Amber Hillman - http://ambersantics.blogspot.com
Ann Marie Saunders - http://cre8nart.blogspot.com
Irit Shalom - http://iritshalom.blogspot.co.il
Kelly Santi - http://sandcastlestamper.blogspot.com
Maureen Russell - http://maureensmagic.blogspot.com


Saturday 12 July 2014

Oak House Studio One stamp event

Hello my dear crafty friends!
Today I want to share  something totally different from my usual design work: 3 cards made for an event I was invited to take a part.
Oak  House Studio is an UK based stamp company and  sometimes they have this One stamp event. Everyone is invited to get a same stamp and to show the different ways of using this stamp.
I was sent this lovely heart shaped Walesby Heart small   stamp and to take part it this event.
My first thought was to make 3d embellishments such as flowers or  butterflies using the hear shape. But due the  late shipping and the massive rockets  attack in our country I just had time to make a card.
But then I decided to make a few of them and to show you how the very same stamp can be used in 3 different styles.
The first card was made with my usual resist emboss and watercolor love: the stamp was stamped with white ink, heat embossed with white powder and painted with a mix of rainbow Gelatos.The central piece is a same stamp , stamped over vellum three times and made to this 3d heart embellishment.


 After cutting the piece to a card shape I had a leftover piece and had a blast: make another card and this time make it clean and simple one layer card. This is how the second card was born.


But then I still had some spare, between attacks and running to the shelter room, time and made another card and this time  in black and white elegant style with one single heart stamped and heat embossed in gold.


As you can see this lovely stamp works great in all possible style (sorry I don't have time to make it in shabby/vintage or dark industrial style, but it's sure possible). And who knows- as the event is for 2 whole days I maybe can do something more with the same stamp.
You are invited to see what we created for the event and even to take part in the next event with a different stamp.
 I enter those firswt 2 projects to Craft stamper emboss resist challenge

Thursday 10 July 2014

Happy Birthday with Inspired by Stamping

Hello my dear crafty friends! Today I am going to show you a fast , but lovely Birthday card made with 2 distress inks,  two stamps and a lot of inky fingers.
I made a die cut chipboard base for this card with a die and inked it with just 2 distress ink colors(the greens are from mixing blue and yellow). Then I stamped this gorgeous IBS flowers image with black permanent ink and inked the stamped image above with the same inks.


The sentiment was stamped  over IBS die cut banner and I just added a few crystals and pearls to make it glorious. As the last touch  some glitter glue was added over the  flower images to add some texture.


Wednesday 9 July 2014

Mixed Media card tutorial with Inspired by Stamping

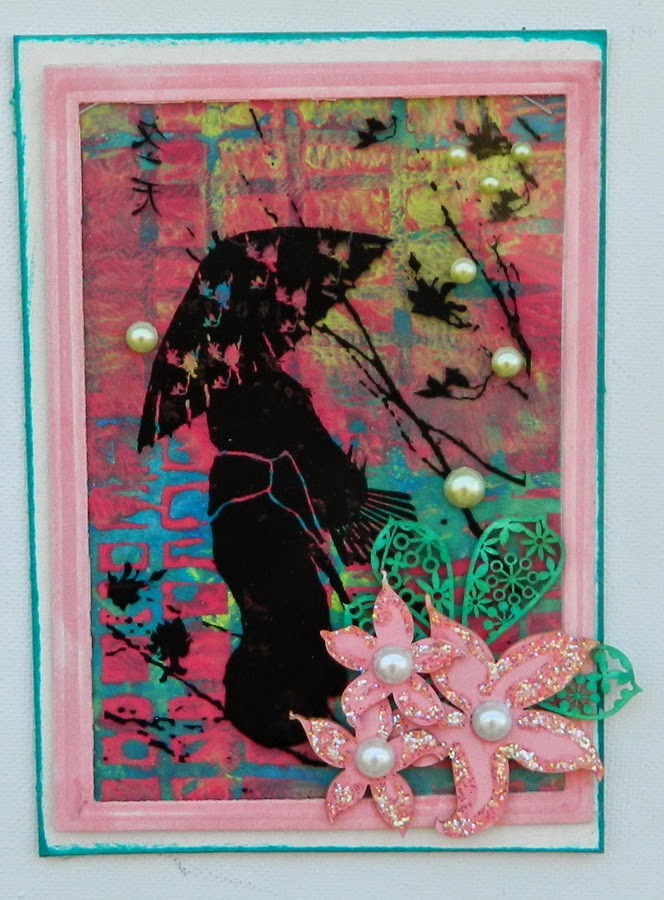
Hello my dear crafty friends ! Today I am going to show you a fast and trendy Mixed Media card tutorial.
 As most of you know lately I am deep into this Mixed Media techniques and  Mixed Media cards are no the exception. You don't need to be afraid of those " Mixed Media" words. It's just some different from  inks and  markers , but not so much different after all.
Sometimes I  get those delicious sentiment stamps with words like sunshine, stars etc, but don''t have any  image stamps that fit the subject. As I do own some stencils that fit the subjects I would use them here and will show you how easy  Mixed Media card can be done.

1. Step one : make flat and free of mediums space for the sentiment die cut.
Die cut the shape you want to use for your sentiment and adhere it with some non permanent glue on the place you want it to be on your card.


2. Step two:make your textured background
Now  adhere your stencil over the glued sentiment spot.


Mix a bit of texture paste with s bit of mist or any other fluid paint and add it over your stencil. Peel the stencil off and let it dry. Peel the sentiment spot off when it's totally dry.


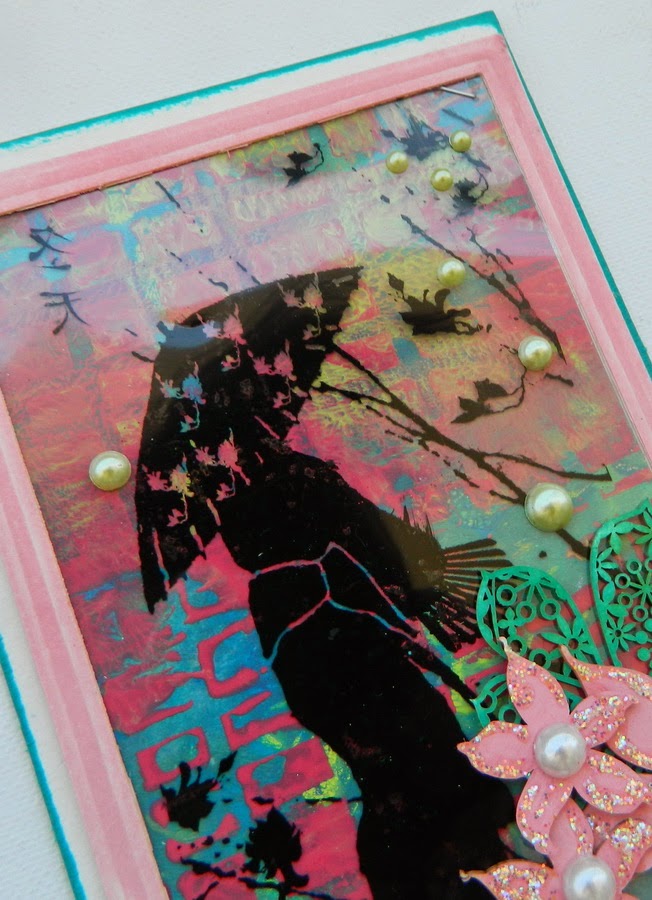
Actually your backgound is done, but you can add some more interest to this background with a few modifications.
a. Mist your dry background with a light mist in the close to basic colors.
b. Add some embossing powder in the close to basic colors to the wet paste  and heat emboss the wet paste to get this lovely and interesting texture I got on my final project.

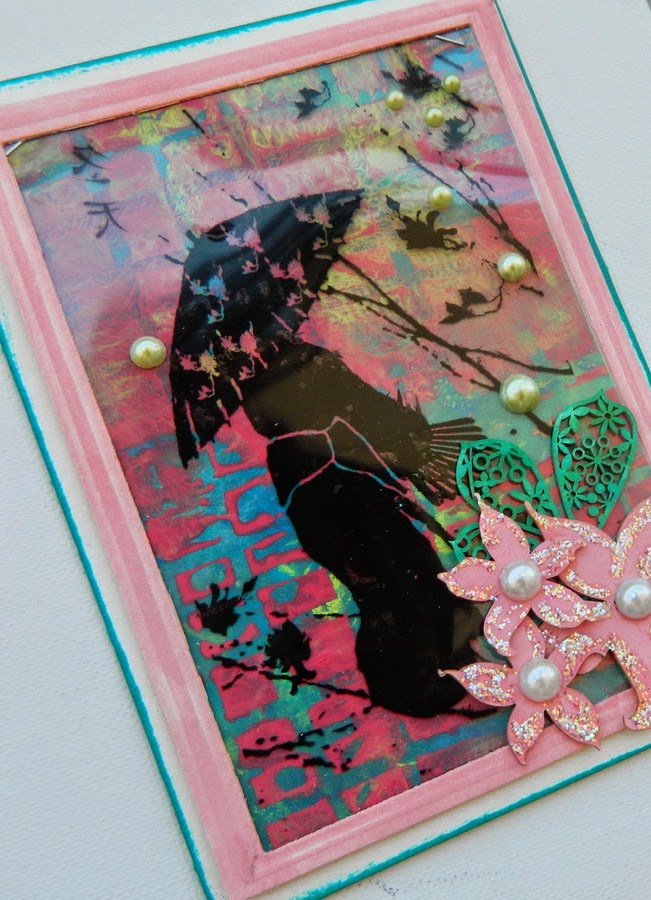
Step three and final:
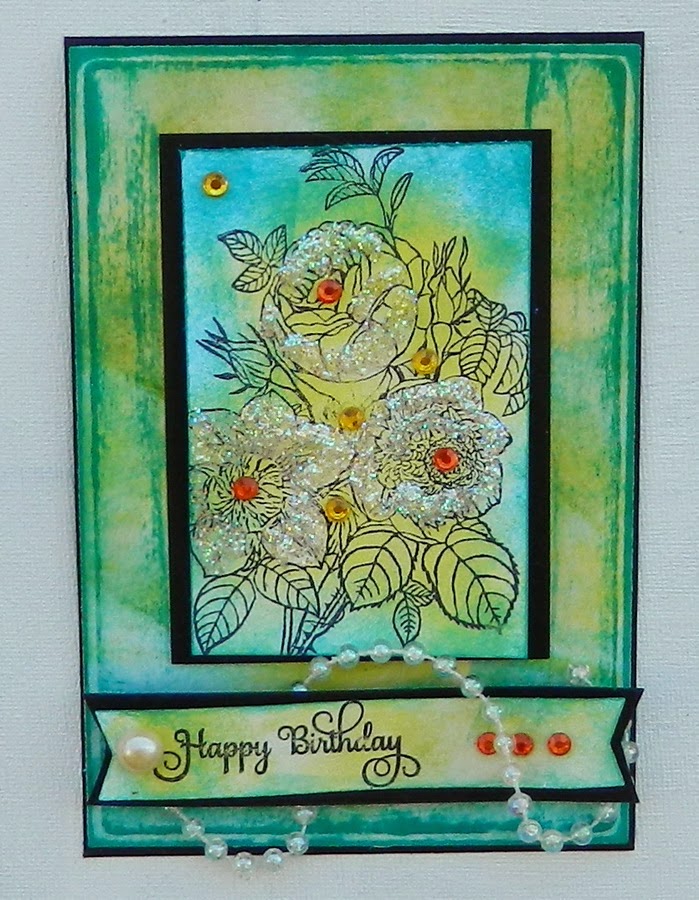
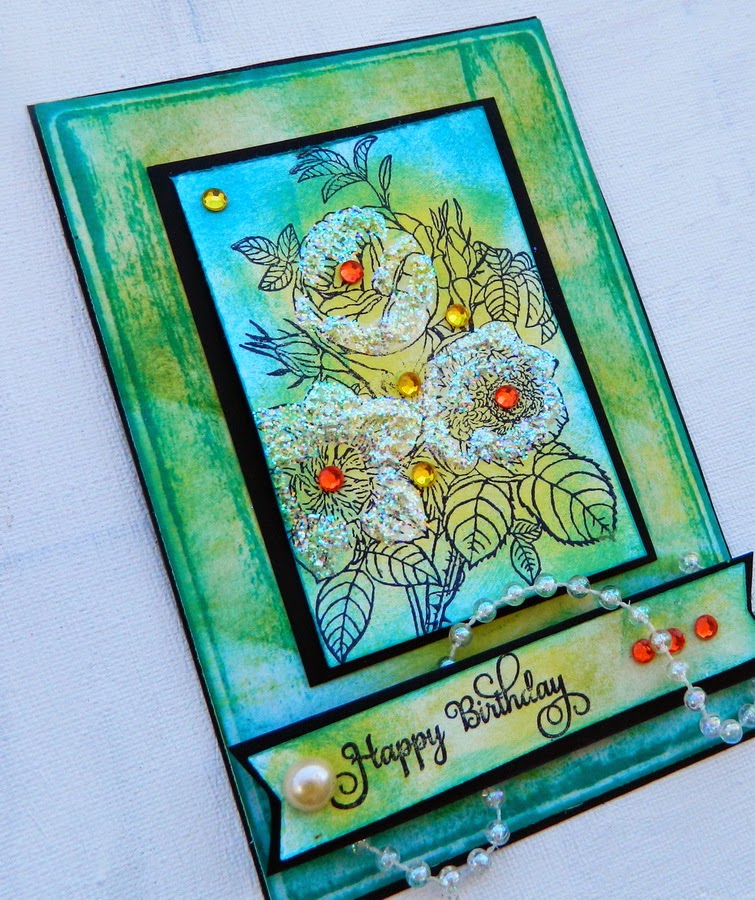
Die cut another sentiment spot (oval in my case) , stamp the sentiment and ink the edges. Glue the  sentiment die cut in the flat space left with 3d glue foam . Make the basic card and glue the front panel over it.


And just to show you how easy and versatile this technique is I made another card, this time using this lovely " Stars" sentiment and  using star pattern stencil. This time I used another IBS die, but it is just the same technique (this time with a lot of misting over the dry background)


Popular Posts