Friday 29 August 2014

Inspired by Stamping July new release: Art of selfies lo

Hello my dear crafty friends and welcome to Inspired by Stamping new July release.
Today is the last day of this gorgeous release and we are going to show you Chevrons  stamps set. But as I made a layout, I decided to use at least three of new released sets over this project and also used Planner set and Friends   set.

I made with page with PHP  products- mixed collection and Art 3d sticker title and I think it's very trendy to make a page with Photo booth strip of selfies. Yes, actually the photo booth photos are bad selfies and always were. This is my pretty daughter Nitzan- the dark one- with her good friend Anna- the blond one- making funny faces over the strip.


 I used this Friendship sentiment to show this good friendship; lots of chevrons and other background stamps from all sets over this Mixed Media page. Then I made a kind of stamped journalling with Planner words that can be used here and not for a planning only.


I enter this to Frosted designs Stamp anything challenge


Goodbye summer blog hop with PHP


Thanks for hopping along with us in our Goodbye Summer Blog Hop this weekend! We're so glad you're joining us, and hope you're inspired by all the amazing projects our Design Team has been creating!
If you've never done a blog hop before, we're happy you're starting with us! To begin, just visit the first designers' blog in the list below. Look at her project, leave her a little bit of love in the comments section of her post, and click on through to the next designer on the list. Each blog will have the list repeated, so you shouldn't get lost along way! After you've visited and commented on each blog, just come back here and enter our contest to win a pretty awesome prize pack!

The awesome prize for this Hop is an Endless Summer Paper Pad. If you've been waiting for the perfect paper to scrap all of your summer memories, then wait no more, this pad is it. From it's amazing color palette to the perfect images, you will love every page!
There are a few ways to enter - the first two are freebies by liking us on Facebook and signing up to receive Facebook notifications from us (we don't want you to miss any of our great project posts!). But the big entry comes from commenting on each of our designers' posts! If you do, you'll get +5 entries into our drawing! AND, you can do that once a day for a total of 20 entries! That sounds like a deal!
Goodbye Summer Blog Hop Designers
Make sure to hop through each designer down the list to be eligible for the most entries! When you're done, just hop back here and let us know, and enter the rafflecopter giveaway below! The hop will be running all weekend, so you have until Monday at 11:59pm EST to get your entries in!

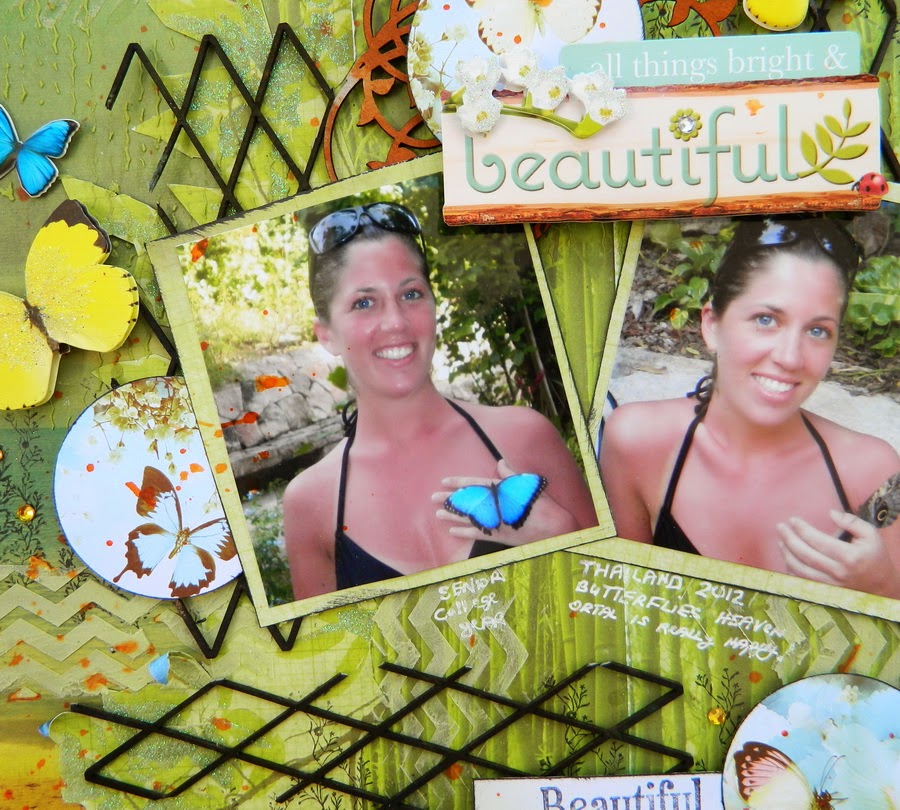
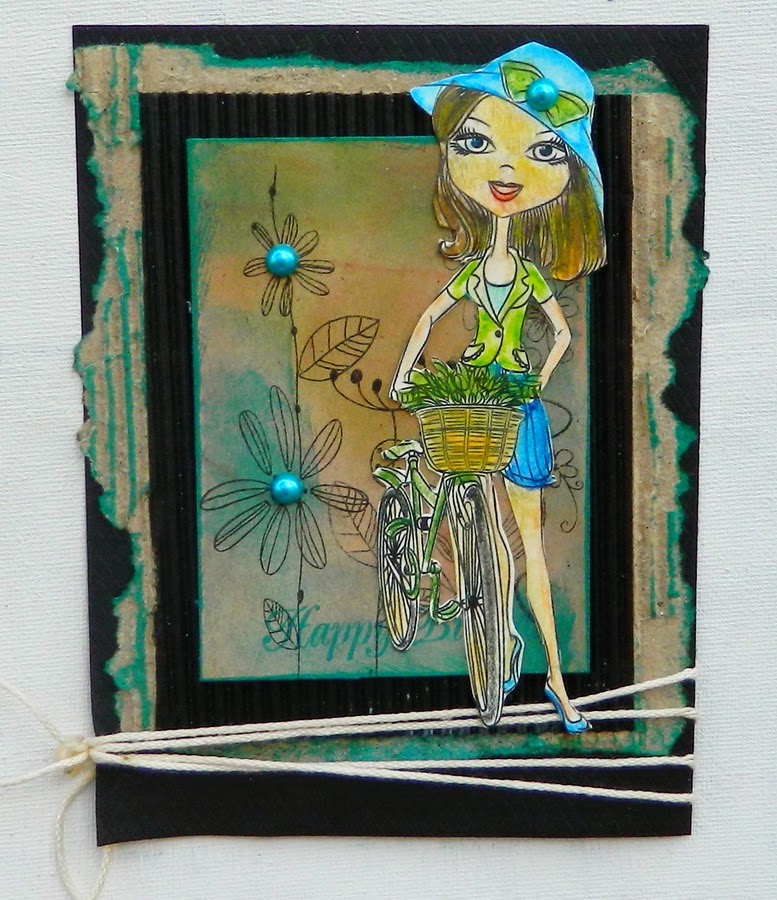
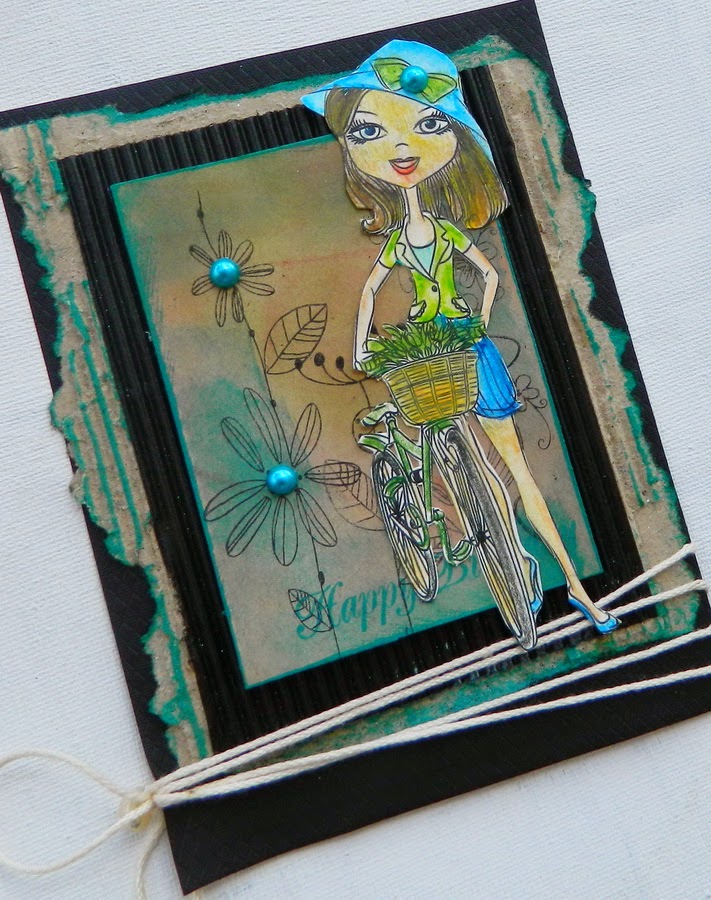
 And this is my layout made for this blog hop.
I made a summer page that I called " Indian summer". As you all know indian summer is the last days of the summer before we see the first fall leaves around. But for me  this is a real summer with photos from my India vacation.
I made it in those deap warm end of the summer- early fall colors and with a lot of PHP products, such as paper, cardstock stickers, 3d stickers, chalkboard  and puffy stickers all together. 
T he only non PHP products are some foam letters,  chipboard title (Creative Embllishments) and a lot of stamping made with Rubber Dance  company sets of stamps.


I hope you like my project and now fo to your next stop on this blog hop: Christine 
And here is box you should enter to WIN!  a Rafflecopter giveaway 


Thursday 28 August 2014

Rainbow bookmark and a card with Faux Quilting Ann Butler's Stamps!

Hello my dear crafty friends! Today I want to share my small tutorial made for Ann Butler's blog.
I made a bookmark and a card  from the single stamped piece and it coordinates in this lovely way and very easy to make.
Step 1: Stamp a few squares with different stamps with black permanent ink  over  white cardstock.


Step 2: Using all 6 Ann Butler's Crafters inks (Clearsnap) make a rainbow over the stamped images as shown.


Step 3: Cut the inked piece into two non even part; one should be a bookmark, so  cut it like one third and two thirds.


Step 4: Make the black matting for the card and for the bookmark. Add some color splashes and stamp the sentiment over both projects. Add ribbons on the bookmark top.


Products used: Ann Butler products
Ann Butler's EZ De's 2'' Checkered Woven Hearts by Kellycraft
Ann Butler's Crafter's inks by Clearsnap

Wednesday 27 August 2014

Encouragement card #2 for Inspired by Stamping!

This is my second encouragement card made with Inspired by Stamping die and stamped sentiment and one and only gelli plate background. This time with a totally different dies and totally different sentiment, but just the same fast and easy, but yet unique- because of the background- card.


 Products used from IBS
Fancy labels 1
 Words of inspiration stamp set

Tuesday 26 August 2014

CHF Anything but a card challenge: Beautiful lo


 Hello my dear crafty friends! Today  I am going to show you my new layout made for Cornish Heritage Farms Anything but a card challenge.
Usually I make all kind of projects, such as cards, tags, OOP and scrapping. So for my own Not a card challenge I decided to scrap and those gorgeous CHF stamp sets were just perfect for the challenge.
I used  Beautiful stamps set  all over the page. Scrolls and flowers were stamped randomly over the PHP paper and then I made this Beautiful sub- title  with two more stamps from this set.


This is my lovely twin Ortal here playing with huge butterflies during her Thailand vacation a couple of years ago.

And if you want to play with our challenge you are invited!
Here is a list of all other designers and I am sure you can get a lot of inspiration there too.
Cornish Heritage Farms Blog - http://cornishheritagefarms.blogspot.com
Frances Byrne (Design Team Co-ordinator) - http://stampowl.blogspot.com
Kristine Reynolds - http://stampingandscrapingincalifornia.blogspot.com
Steph Ackerman - http://stephaniescraps.blogspot.com/ 
Amber Hillman - http://ambersantics.blogspot.com
Ann Marie Saunders - http://cre8nart.blogspot.com
Irit Shalom - http://iritshalom.blogspot.co.il
Kelly Santi - http://sandcastlestamper.blogspot.com
Maureen Russell - http://maureensmagic.blogspot.com


Friday 22 August 2014

2014: a year of Steampunk- VLVS Guest designer post


Hello my dear crafty friends! Today I am going to show you my second project made as VLVS Guest designer and this is my tribute to Steampunk. About a year ago I hardy knew that this word exists. Now I 
am a proud steampunk lover and I made this chipboard tray as my 2014: Steampunk year.


I should say that the only Steampunk stamps I own are from VLVS and I bought them long before I was asked to be their guest designer. I just think that VLVS have the best assortment of steampunk stamps in the world! I believe that this is true and not just my statement. Then I have a few steampunk chipboards and some Tim Holtz metals. That is practically all. But look how much can be done just with a bunch of lovely 
stamps, some inks and a lot of imagination!


So here is my tray: each window is heavily stamped, heat embossed and inked over. Some of the windows 
are collaged and some were made with a single stamped image only. The grunge 2014 letters were hand cut and adhered over 3d foam glue for the dimension. I even stamped this small letter in the bottle with Dictionary stamp and rolled into the tiny bottle.


 As for other techniques: I used crackled paint over the frame and added a darker shade with more ink over the dry paint. I changed the color of metal plaque with alcohol ink. I heat embossed the chipboards around with a mix of 2-3 embossing powders. Not much and maybe even too much. I like the final result and I am very proud of my steampunk project.
And finally I want to thank DeeDee and VLVS for the great chance to be their guest designer. I hope I 
 inspired VLVS blog readers and hope to be back here some day!
I also enter this art piece to a few web challenges
SSSS- Anything goes
 Anything goes for Stamping Sensations
 Artistic stamper- Anything goes


Thursday 21 August 2014

Encouragement card #1 for Inspired by Stamping

Sometimes card need to be made as an encouragement. This is one of those cards I made and I have two more to post on the later dates too.
I made this card with Gelli plate background: acrylics and found bottle cups were arranged to make this background. The sentiment and the die are both from Inspired by Stamping and actually this company has a few great encouragement sentiment I used on other cards too.
Very fast and easy  to make card, but then totally unique one as each background made this way is one and only.


Products used from IBS
Fancy labels 3  set- round die
 Words of inspiration stamp set
 I enter it to Craft Stamper monthly challenge using Stamping with household objects  February 2014 issue Birgit Koopsen technique (bottle and jar caps and twine) and The ink splatter technique by Ali Johnson, January  2014 issue

Wednesday 20 August 2014

Inspired by Stamping tutorial

Tutorial made with Inspired by Stamping stamps
 Box card
1. To make this card we need a simple template I am going to add here for you. Use 12*12'' cardstock and cut a piece measured 12*5 3/4 '' size. Score it vertically 4 times on 3 3/4'' sections, so you will have 4 rectangles and one strip on the edge. Score it again horizontally on 2 1/2'' from the top. Now cut as shown on the template with red line. Fold all blue lines to make a box and glue it using the strip. Fold the green line 
as shown. The base of your cards is done.


And now for the rest of our crafting.
2. Cut 4 rectangles that fit the lower sections, inks the edges and glue them over the lower part of the box.
3. Cut 8 smaller rectangles, ink the edges and adhere them over the flaps: 4 pieces over the upper side and 4 pieces inside the box.
4. Make two strips about 4 3/4'' long of the same basic cardstock. Fold 1/2'' on each side of each strip and glue them inside the box.
5.Stamp the label image from Princess stamp set with light green ink; heat emboss it with clear embossing powder and die cut with a similar IBS die. Stamp the crown with Princess word inside and glue on the front flip. 
6. Die cut the smaller label, stamps the sentiment and adhere on the first glued strip.
7. Adhere some chipboard roses stickers – or stamp some IBS flowers if you have more time- over the second inside strip.

8. Stamp the castle, hand cut it and glue it on the back of the box. Stamp a dress and the slippers, hand cut them and glue on the left flap. Add some other embellishment or stamp something else over the right flap.


And the closed- to mail it- card


Tuesday 19 August 2014

SS Anything goes with new August release


Hello my dear crafty friends and welcome to our new weekly challenge here on Sweet Stamps: this is our Anything goes one. The easy way to enter and even to win!
So here is my new card made with one of our new just released girly images:Claire.
I am not a big " coloring person". So it was quite a challenge for me to color the image and I finally managed to do it with watercolor pencils. Sorry for the pure coloring, but then I usually am a technical stamper, so it's totally not my " cup of tea". But the image is gorgeous and all other new release are even better (more coloring space for those who loves to color images).
I also used some Sketched flowers from the previous release and a sentiment from the gorgeous sentiment new released set.

 Hope you forgive me for the poor coloring and still like this lovely girly stamps from the new August release!


Monday 18 August 2014

SS GARDEN


Hello my dear crafty friends! Today is my turn to show you my Garden creation made for our Sweet Stamps new weekly challenge. I know that its the last day to enter this challenge, but then who knows? You can do a card or another GARDEN PROJECT and even to  win!
So here is my card for today: stamped Mixed Media card made with   one of the new in SS shop Memory box stencils: Modern Blooming Frame.
I used a light green colored texture paste  with this stencil and then misted the white cardstock with blue mist to get this look of my background.
Next step was to make my stamped panel and it was stamped with Wildflowers SS stamp in black. To make it pop I added some red blings over each flower  center and some glitter glue over the petals.
Finally I stamped this lovely sentiment from the new SS Simple Sentiments set. I love this font a lot and it's  a must to have set!


See you tomorrow in our SS blog for new challenge and more inspiration!


Friday 15 August 2014

Die-Versions/Sparkle N Sprinkle Blog Hop

Welcome to the Die-Versions and Sparkle N Sprinkle Blog Hop!
This is a second post  for today- so please scroll for the first one. Busy weekend!


The joint blog hop with Die-Versions and Sparkle N Sprinkle begins today (7am EST) and goes until Aug 17th (5pm EST), so there will be plenty of time to check out all the great projects created by both teams.  The theme is Christmas, so you'll get lots of great inspiration for your upcoming Holiday cards.

Die-Versions manufactures low profile dies made right here in the United States and Sparkle N Sprinkle manufactures rubber stamps, glitters, embossing powders, and flocking, also made in the US.  This is like a match made in heaven - low profile dies combined with lots of bling!  Doesn't get much better than that.

One winner will receive a Grand Prize consisting of a $50 gift certificate from Die-Versions and a $50 gift certificate from Sparkle N Sprinkle, for a total of $100.  The winner will be announced on Aug 17th on both the DV Blog and the SNS Blog as well as their Facebook pages.

In order to be eligible for the Grand Prize, please: 
  • Leave a comment on each Designer's blog
  • Follow both companies on Facebook (DV Facebook pageSNS Facebook page) if you haven't already so you can keep up to date on all the latest goings on.   (I'm sure that all of the Designers would love for you to Follow them too, but that isn't a requirement to win this prize.)   
You should have arrived here from Mary blog.
 If not, then you should begin at the Die-Versions Blog and end at the Sparkle N Sprinkle Blog.  If you get lost along the way, you can go to either the DV Blog or the SNS Blog to see the complete list of participants.

We'd love it if you'd like to leave a comment at either the DV Blog or the SNS Blog telling us which projects were your favorites.  :-)

So here is my card made for this hop.


 All DV DT girls got a lot of powders and glitters from SNS company and we also got this gorgeous tree stamp. As I got this lovely winter cottage die from DV July release It was so clear that I am going to make a scene full of glitter card.
So I first stamped the trees over the white cardstock and heat embossed with Winter white EP. Then I stamped the same trees again and heat embossed with Frosted Juniper EP and hand cut them out.
The winter cottage was die cut from white cardstck and heat embossed with Winter Berry EP and then layered over the double sided glue sheet and Cloud nine glitter was added all around over the cut out adhesive surface. I misted the panel with blue mists and added some random sprickles of Cloud Nine glitter and Rapture blue glitter.
Then I arranged the card and added some pre- made stickers; lucky me as those PHP stickers were glittered with the same blue color as the one I used over my piece.


Your next stop on the blog hop is Archana

We hope you enjoy this blog hop and it gives you lots of inspiration!  Don't forget to leave each of us a comment and follow both Die-Versions and Sparkle N Sprinkle on Facebook.

Popular Posts