


So the post was made then, but the project was never seen. Maybe now it's a time as it's full of Spring colors?
First I need to say that I was totally on cloud 9 just to be BoBunny finalist. But then I am on cloud 9 again as this is my very first time to own the entire paper and embellishments collection from any company.
Living in Israel is not so easy for an addicted crafter: you can buy some products here, but not everything and you can order some , but still not everything. So to get the full collection makes my crafting possibilities just endless.
And this is a reason for this very long post. At the beginning there was one project done. Then I decided to add more small crafts and more and more... Finally I just dropped when most of my bright colored products from this collection were used.
So bare with me if this post is too long, please!
I promise to showcase you some lovely , easy to make, sometimes just in 10 minutes, projects ans I am pretty sure that you will rush to the nearest shop to get yourself this Butterfly Kisses collection.
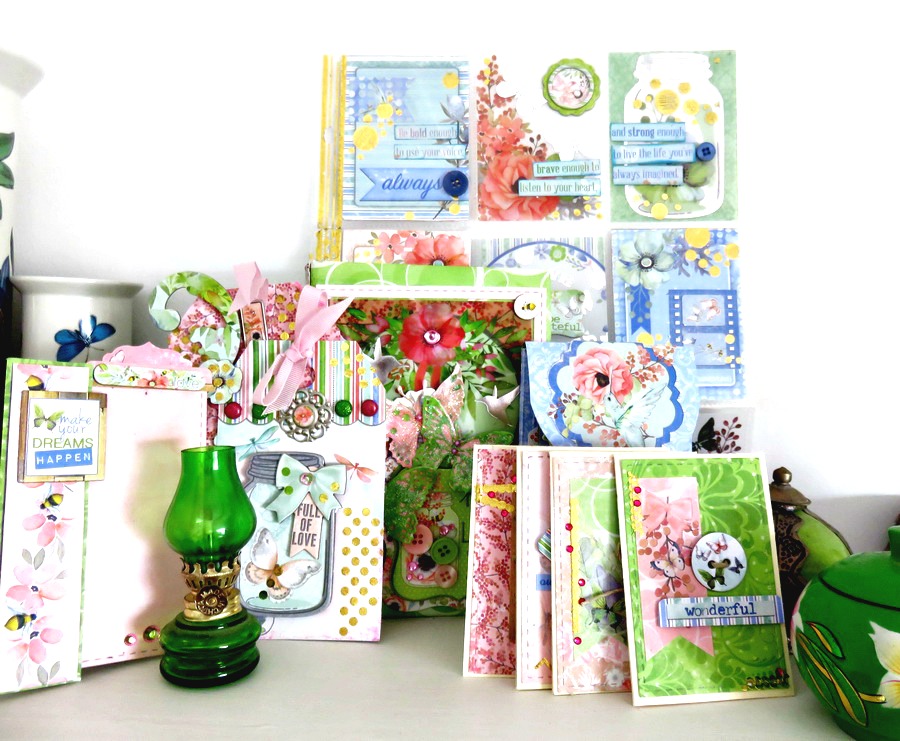
And now those are my projects all together is their shining glory:
The main piece of my craft collection is a book shaped self made shadow box.
Long time ago I made a tutorial in my blog with step by step instructions for this project and as this blog post is not a tutorial, I am just going to show it and to explain a bit about it.
All you need are three recycled chipboards that I covered with BoBunny patterned papers to make a kind of a book cover.
To make it look more similar to a real book I added a spine and even a chipboard piece as a title.
So my book is called " Butterfly Kisses". How about that"? Pretty much obvious.
This is how this beauty looks from the side:


And this is the front over embellished cover. Yes, the front can be bulky and shiny and you sure can add even more layers to it. I made a hand made frame with patterned paper over a chipboard (sorry, dear BOBUNNY, this is the only products that I used that is not yours. I just had to use a rectangle die to make it pretty and professional).

Inside this pink frame I added the piece of Butterfly Kisses Foil Vellum paper and it was just in a perfect size to fit this frame inside.
A few pieces from Butterfly Kisses chipboard was added over the frame to make the title ans then I even embellished the jar over the chipboard with the same collection buttons and a few pink rhinestones.
For the next step I die cut three most adorable paper butterflies using BoBunny Flutters dies and made around the dies hand cuts as the second lower layer.

The inside of the cover has two parts. The left one is just a cover and it should stay flat. So I just embellished it with Butterfly Kisses Noteworthy pieces and some Combo Stickers and added a few rhinestones.

And now the shadow book shaped part of this project:

But my entire project has much more pieces made in the same style with the same bright part of this collection, but they are totally different.
When you have a shadow box you can put things inside! So I made a few to put inside this box.
The first one are a bunch of mini greeting cards made in this " Take 10" style (you can make each one for not more than 10 minutes and maybe even less). Make the basic cardstock cards, add the front paper panel, adhere a sticker, add the sentiment and embellish with a single button.
Here are all four together:


But wait! Didn't I made them to put into the box? So here they are inside the box:

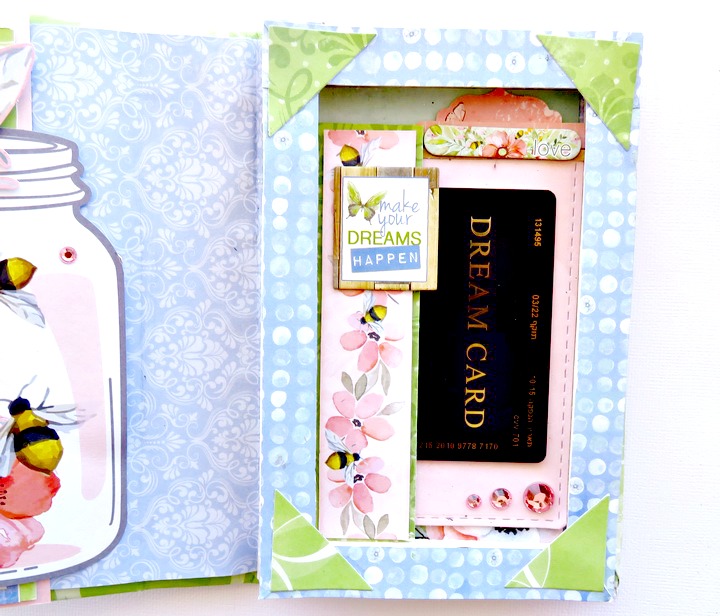
The second project that I made to add into the box was a Gift card holder.

And look how fancy it looks inside the box!
This is my " master piece tutorial " project: I made a tutorial a few years ago in my blog and this mini album post still is a top star of my blog. Then I was asked to teach Make N' Take with some paper company on last Winter CHA and ... Yes, it was this kind of a mini album and it was a hit too.
So without a tutorial: one 12*12'' sheet of double sided paper; three folds; 4 scissors cuts and whatever you decide to add inside and outside as long as it is FLAT!
This is how it looks when totally closed:

Unfold the flip:

Unfold the top fold down:


Unfold the top and bottom flaps to left to see it totally open. By the way, the lovely kids are my own grand kids about a year ago.

And now let me show how it fits the shadow box- on the top, not inside, but you still can close the whole structure.

After making three " old fashioned" projects I decided to add a trendy one. How about this Pocket letter? If you are not familiar with this swap item, it's just a Baseball/Football cards refill filled with 9 hand made cards and it's very similar to Misc Me project.
So with four vellum and four paper card that I found in this collection I just added one more vellum piece as the main theme card. And the reason this pocket letter is a great box filler is that you can and need to fold it as the main reason you make then are swaps.
So here it is inside the box:


I made a fancy gift tag to add to the shadow box with all crafts inside. And I am totally in love with this
BoBunny collection as you can see from the sentiment over my tag.


Now I cross my fingers for like two weeks to see if I made the team . Please , cross your fingers for me too!

BoBunny Butterfly Kisses Lush
Butterfly Kisses Springtime
Butterfly Kisses Delight
Butterfly Kisses Bliss
Butterfly Kisses Flutter
Butterfly Kisses 6*6'' Paper pad
Butterfly Kisses Chipboard
Butterfly Kisses Combo Sticker
Butterfly Kisses Buttons
Butterfly Kisses Noteworthy
Butterfly Kisses Layered Chipboard
Butterfly Kisses Foil Vellum paper
Double Dot Think Pink Jewels
Accents Gold foil transfer
BoBunny Craft Dies Flutter
Other products:
Recycled chipboard
Rectangle dies
Twine
Ribbon
White cardstock
Glue


No comments:
Post a Comment